
 Wood Destroying Organism (WDO) Reports
According to the State of California Department of Consumer Affairs Structural Pest Control Act, a Wood Destroying Organism (WDO) report, commonly referred to as a termite report, must be written and provided to the person who requested the termite inspection within 10 business days of the inspection. A filing fee of $4 per report is assessed. Failure of a registered termite company to report and file with the Board could result in a fine of $2,500.
Reports must be submitted before any work can be completed. Termite reports must be retained by the termite company for a period of three years.
All reports must include:
- A General Description of the Property:
- The report must include basic details about the property being inspected.
- The Person Requesting the Inspection:
- The name of the individual or entity that requested the inspection must be clearly stated.
- Findings and Recommendations:
- All observed findings related to wood-destroying organisms or conditions conducive to infestations must be documented.
- Recommendations for corrective measures must also be included.
- A Diagram of the Property:
- The diagram must indicate the approximate location of any areas infested or infected.
- Inaccessible Areas:
- The report should identify areas that were inaccessible during the inspection and explain why they could not be inspected.
- Conditions Likely to Lead to Infestations or Infections:
- Any conditions that could potentially lead to future infestations or infections must be noted.
- Roof Surface Inspection:
- The report must indicate whether or not the exterior surface of the roof was inspected.
Exceptions
If a customer is under warranty and a subsequent inspection is completed with no new findings, then a new report is not required.
 Findings and Notes in a Termite Report
In a termite report, findings refer to organisms that damage wood—like termites or fungus—or conditions that could lead to those issues. Notes are disclaimers that explain inspection limitations.
There are two main systems for organizing findings: the 1–5 system, which California Termite uses, and the 1–11 system.
- In the 1–5 system:
- Subterranean termites
- Drywood termites
- Fungus/rot
- Conditions conducive to infestation (e.g., wood-to-soil contact)
- Inaccessible areas
The 1–11 system organizes findings by areas of the structure (e.g., attic, crawlspace, patio), but since these areas are already labeled on the graph portion of the report, it can feel redundant.
Findings are lettered in sequence. For example:
- A 2A on the graph means drywood termites were found in that area.
- A 2B in the same spot would refer to related wood damage.
Notes highlight anything that may limit or affect the inspection—such as insulation obstructing the attic, excessive storage in a garage, or the presence of roofing materials preventing roof surface inspection. Additionally, that fences are typically excluded, as they aren’t considered part of the structure.
 Escrow Inspections
In a real estate transaction or a Veterans Administration (VA) refinancing, an escrow inspection—including a Wood Destroying Organism (WDO) report—is typically required by lenders, though not mandated by the state of California. This inspection helps identify potential structural risks related to termites and other wood-destroying organisms before the property changes hands.
Findings in an Escrow Inspection
A WDO report includes two categories of findings: primary and secondary, if applicable.
- Primary Findings: These include any active infestations of termites or other wood-destroying organisms, fungal infections, and any damage caused by these issues.
- Secondary Findings: These refer to conditions that could contribute to future infestations or infections, along with potential resulting damage. Examples include:
- Earth-to-wood contact
- Excess moisture
- Faulty grades (improper ground slope)
- Cellulose debris (wood scraps, paper, or other organic materials that attract termites)
The inspector documents these findings on a detailed diagram of the property, which is included in the report.
Treatment and Repair Recommendations
Along with the findings, the WDO report outlines the inspection company’s recommended treatments and repairs, along with associated costs. This helps buyers, sellers, and lenders understand what actions may be needed to protect the home from termite and moisture-related damage.
Inaccessible Areas
The report also specifies areas that were not accessible during the inspection and the reasons why. Examples of inaccessible areas include:
- Eaves blocked by dense vegetation
- Crawl spaces too small to enter
- Garages cluttered with belongings
- Wooden flooring covered with carpeting
In cases where significant areas were inaccessible, the inspector may recommend further inspection once access is available.
Repair and Treatment Requirements for Escrow
While California law does not require that treatments or repairs be completed before a property sale, most lenders do require them before the close of escrow. Once the necessary treatments and repairs are performed, the company that conducted them will issue a completion report and clearance for the buyer to present to their lender.
 Section One Clearance
Clearance is required in most real estate transactions. Before a loan can be approved, the home must be free of all wood-destroying organisms, and there can be no damaged wood. Typically, the inspector who originally identified the infestation, infection, and related damage is also the one who verifies that those issues no longer exist. Once confirmed, that inspector issues a clear Wood-Destroying Organism (WDO) report, which is filed along with the other real estate documents.
Without clearance, loans can be delayed, and everyone’s commission is put on hold. As a result, termite inspectors may feel pressure to “make the deal work.” This is one reason many realtors develop close relationships with specific termite inspectors or companies—they believe they can rely on them to keep transactions moving.
That reliance, however, isn’t always in the best interest of the buyer or seller. Conflicts of interest can arise, especially when speed is prioritized over accuracy. In fact, at least one termite company I’m aware of is owned by a real estate firm. While it may be legal, it certainly raises questions about objectivity.
There are also termite companies that exist primarily to service escrow inspections. Many inspectors begin their careers at established firms, build relationships with realtors, and later leverage those connections to start their own companies—often with escrow work as their main focus.
 Field Work Sheet
Whether completed on a tablet or on paper, the field work sheet is a vital part of the termite inspection and control process. It includes key details such as the inspection date, customer information, and a description of the home. But the most important element is the graph of the structure.
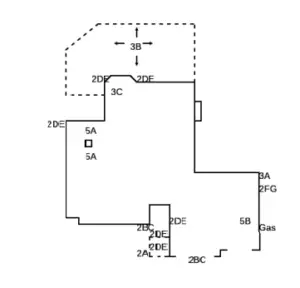
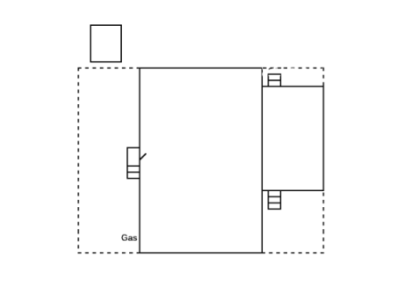
The graph is where the termite inspector records all findings on a diagram of the home. This diagram must be accurate so both the homeowner and termite technicians can easily locate areas of infestation, infection, or concern. A well-drawn graph eliminates the need for technicians to reinspect the property—they should be able to rely fully on the inspector’s diagram to know exactly where to treat. Likewise, a homeowner should be able to send the diagram to a wood-repair professional, who should then be able to identify the damaged wood without confusion.
The field work sheet also serves as a snapshot of the home’s condition at a specific point in time. In a real estate (escrow) inspection, the diagram documents everything that must be corrected before clearance can be issued.
 Termite Inspection Equipment
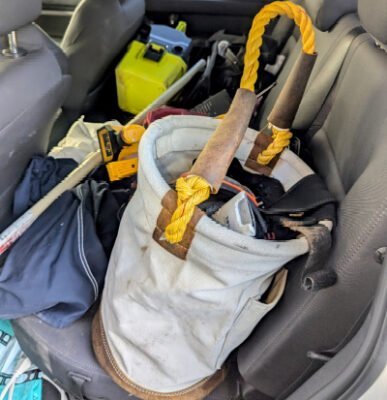
A thorough termite inspection requires the right tools. The following equipment is essential for conducting a proper inspection:
- Painter’s Poles – Two extendable poles: one that extends from 4 to 8 feet for first-story eaves, and another that extends from 8 to 16 feet for second-story eaves.
- Flashlight – A high-powered, rechargeable flashlight for inspecting attics, crawlspaces, dark-painted eaves, and hard-to-reach areas behind appliances.
- Ladder – A sturdy A-frame ladder that extends between 12 and 18 feet.
- Chalk – To mark termite-infested areas for reference.
- Phone with Camera – For documenting evidence of infestation.
- Clipboard & Graph Paper – To sketch the structure and note findings.
- Erasable Pens – Allows for easy corrections while documenting.
- Measuring Wheel – To accurately measure the structure you’re inspecting.
- Tools – To open crawl hatches, termite galleries, etc.
- Magnifying Glass – Helps with identifying insects up close.
- Mirror with Light – Useful for checking above ledges for termite droppings.
- Knee Pads – Protects knees when crawling through attics and crawlspaces.
 Extension Poles
Nobody makes a pole specifically for termite inspections—probably because there aren’t enough termite inspectors in the world to justify it. The poles I use are designed for painters, with a threaded tip meant for paint rollers. There is a probe attachment available, but I find it unnecessary and more likely to cause excessive wood damage.
I carry two extension poles: one that extends to 8 feet and another that reaches 16 feet. The shorter pole works well for first-floor eaves, while the longer one handles most second-story work. At over six feet tall, with about another two feet of reach, I can access the majority of eaves without a ladder. When something is out of reach, that’s when the ladder comes into play.
It’s important to tap or probe every accessible section of eave wood. Some inspectors rely solely on visual inspections, and while that might work when damage is obvious, it often isn’t. Many times, I’ve probed wood that looked perfectly sound—only to have it break open, revealing hidden termite activity.
 Probing for Termites
Probing exterior wood members—such as fascia, rafter tails, and other exposed structural elements—is the most common method termite inspectors use to detect termite activity on a home’s exterior. Most inspectors carry two extendable poles: one about five feet long for first-story eaves and a ten-foot pole for upper stories. Some also attach a probing tip to the end of their pole.
The inspection process typically begins at one corner of the home, with the inspector systematically tapping each wood member around the perimeter. If the home has a second story, they complete the first-story inspection before switching to the longer pole to probe the upper level. This process can be particularly strenuous on homes with multiple exposed wood components in the eaves. While some homes have a simple fascia board running along the exterior, others feature a more complex arrangement, including blocking, rafter tails, starter boards, outriggers, fascia, and fascia trim. When probing second-story wood with the heavier, longer pole, inspectors often need to take occasional breaks.
Probing doesn’t require excessive force. If the wood is solid, nothing happens. If termites are present, even a light tap can cause the wood to crack. Occasionally, what appears to be intact wood will break apart, releasing thousands of termite droppings. (For a termite inspector, finding droppings in their hair at the end of the day is a sign of a successful inspection.)
There’s no need to probe wood that is visibly infected with fungus or already showing clear termite damage. Some inspectors who offer wood repair services claim they must determine the full extent of the damage, but that doesn’t mean they should leave your eaves in ruin.
In attics and garages, probing is rarely necessary. Instead, inspectors look for telltale signs like termite droppings to assess activity.
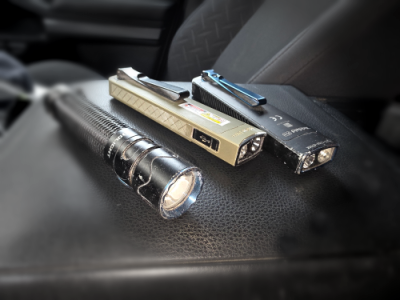 Flashlights
When I first started in termite control, my flashlight was the size of my forearm and weighed more than five pounds. I carried it in a loop attached to my belt, and I was constantly adjusting my pants from the weight pulling them down. It ran on batteries, so I always had to keep extras in the truck.
Now, my flashlight fits in my pocket and weighs less than a pound. It’s rechargeable. As long as I remember to plug it in while I’m driving, it’s always ready to go. It’s also far brighter than anything I used back then. Lumens are a thing now. I can be perfectly satisfied with my current flashlight, then see one online with five hundred more lumens—and the next thing I know it’s in my shopping cart.
My only complaint about modern flashlights is that they offer no protection. Back in the day, that old metal flashlight could’ve doubled as a weapon—useful if I ever ran into a would-be attacker or a cornered rodent.
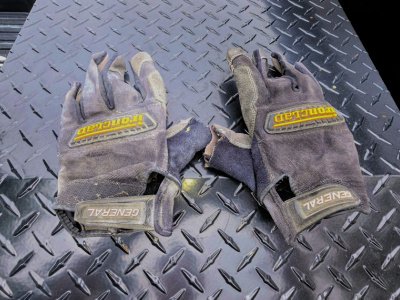 Work Gloves
Gloves are an essential part of every termite inspection. Inspecting an attic without them is asking for trouble. Attics are full of splinters, sharp truss plates, exposed nails, and itchy fiberglass insulation—all of which can make for a miserable inspection.
Crawlspaces present a different set of hazards. Gloves protect your hands from dirt, cobwebs, moisture, and whatever else has accumulated beneath the home. Even garages can be hazardous, as the exposed rafters are often unfinished and prone to causing splinters.
Because I take photos throughout my inspections to document my findings for homeowners, I modified my gloves by cutting the tip off the thumb. This allows me to operate my phone’s touchscreen without constantly taking my gloves off and putting them back on, making the inspection more efficient while keeping my hands protected.
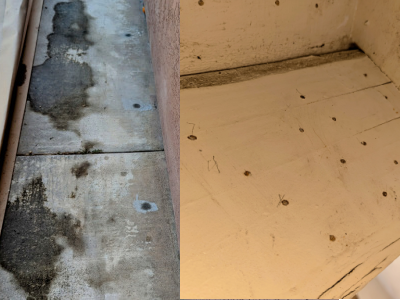 Drill Holes
Drill holes are an important clue a good termite inspector looks for when evaluating a home. They often reveal whether and how a property has been treated in the past.
For drywood termites, holes are drilled directly into the wood—typically about ⅛ inch wide—and then sealed with caulk after treatment. For subterranean termites, holes may be drilled through pavement or concrete to reach the soil below. These holes are larger, about the size of a dime, and are usually patched with concrete once the treatment is complete.
If a section of wood shows termite damage and drill holes are present, the inspector should ask the homeowner when that wood was last treated. The same goes for subterranean treatments: if conditions are conducive for termites but there’s no visible activity—and patched areas are noticeable on sidewalks or slabs—it’s wise to ask when the soil treatment was performed.
Because the professional-grade chemicals used in termite treatments can remain effective for years, these questions help determine whether an infestation is truly active or if it may already have been addressed.
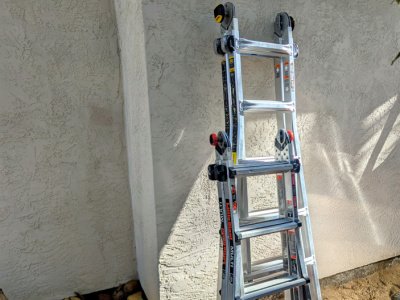 Ladders
The three most essential tools a termite inspector carries are a ladder, a flashlight, and a probing stick. Of the three, the ladder is number one. Without it, you can’t access an attic—where you’ll need the flashlight—and while some inspectors skip probing (though they shouldn’t), nobody can skip the ladder.
The best type of ladder for inspections is a folding extension ladder. It’s versatile, sturdy, and can be set up in different ways to reach attic entrances that come in all shapes, sizes, and heights. Sturdiness is especially important since ladders are sometimes placed on uneven surfaces.
The trade-off is weight. The best ladders are heavier and harder to carry, but their reliability and versatility make them worth the extra effort.
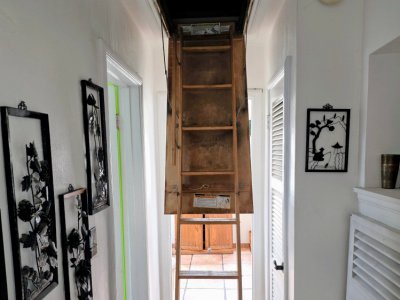 Drop Down Stairs
For some reason, people with drop-down attic stairs almost never mention they have them. They’ll watch me wrestle my ladder up the main stairs to the second floor, and only then say, “Oh, you don’t need your ladder.”
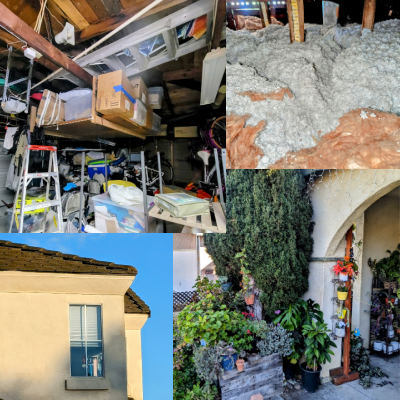
Most garage attics have drop-down stairs. Maybe ten percent of house attics do. They’re useful for homeowners who like to store things up there, but they usually mean a more crowded attic, less accessible areas, and more blind spots because of all the storage. That means my termite inspection will be less thorough, and so will any preventative borate treatment afterward.
If the homeowner tells me ahead of time, I appreciate not having to haul a ladder upstairs—but they almost never do.
The issue with garage attic stairs is often everything else stored in the garage. Sometimes there’s no clear space for the stairs to even come down. I’ve had jobs where I still had to set up my own ladder and use the same opening because the drop-down stairs couldn’t be extended.
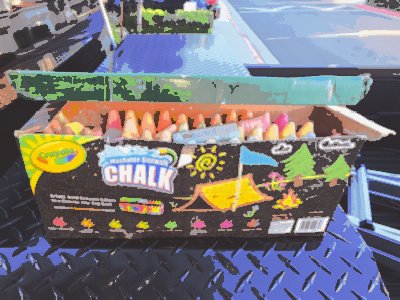 Chalk
Chalk
Sometimes customers ask if I need a flashlight or a ladder. I always find that question a little amusing because it’s hard to imagine doing my job without bringing those tools myself. What no one ever asks about, though, is chalk—and in many ways, chalk is almost as important.
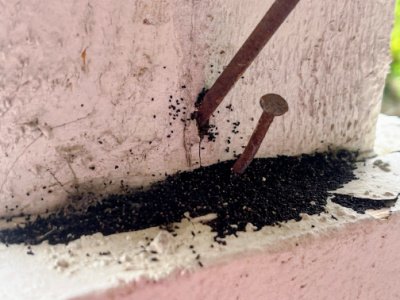
Chalk is how termite inspectors mark infested wood. Outside, we usually make a simple chalk mark on an affected board. In attics, garages, or crawl spaces, the markings are a bit more specific. We’ll write a “K” for drywood termites or an “S” for subterranean termites, along with an arrow pointing toward the evidence—termite droppings in the case of drywood termites, or a mud tube if it’s subterranean activity.
These markings become especially important when there’s a handoff from the inspector to a termite technician. The technician’s job isn’t to locate the infested wood—that’s the inspector’s responsibility. The technician simply needs to know where to treat, and the chalk marks make that clear.
Chalk can also reveal a bit of history about a house. When I arrive at a property and see chalk marks, I know there has likely been another inspection. If the markings are a few years old—sometimes inspectors even write the year next to them, especially in attics, garages, or crawl spaces—but the homeowner says no treatment was ever done, it often suggests the problem wasn’t addressed with much urgency.
When it comes to the everyday tools needed for a thorough termite inspection, chalk deserves to be mentioned in the same breath as a flashlight or a ladder. It may be simple, but it plays a critical role in making sure problems are identified clearly and treated correctly.
 Termite Inspection Mirrors
Not too long ago, I was at a customer’s home after she noticed termite droppings on the threshold beneath a patio door. Doors are typically hollow, so I drilled a small hole in the end of the door—where it would be less conspicuous—and injected a foam termiticide inside. Because foam expands, I assumed it would spread through the void, find the termites, and solve the problem.
When the droppings returned, so did I.
My assumption was that the activity was somewhere in the bottom portion of the door. But unless I removed the door from its hinges, how could I know for sure? The answer was simple: an inspection mirror. It’s something I should have used the first time.
I held the mirror under the door and quickly found the kick-out—the spot where drywood termites push their droppings out of the colony. Once I saw that, I knew exactly where to treat. Judging by the fact that I haven’t heard back from the customer, the treatment worked.
Inspection mirrors are also useful in elevated areas where you can’t fit your head to get a direct look. Framed vents in crawl spaces and the framing above garage doors are good examples.
These days, when I start a termite inspection, my mirror is ready to go—right next to my flashlight in my pocket.
 Termite Report Notes
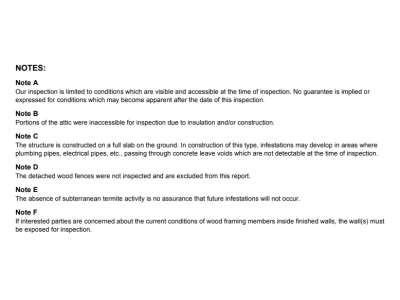
Notes serve as disclosures that explain the limitations of a termite inspection. The notes I commonly include address inspection conditions such as attic access, foundation type, fences, subterranean termites, and wall construction.
A termite inspection is limited to areas that are visible and accessible at the time of inspection. Portions of the attic may be inaccessible due to insulation depth or construction design. In homes built on slab foundations, termite infestations can develop in concealed or undetectable areas. Wooden fences are not included in the inspection unless specifically noted. The absence of visible subterranean termite activity does not guarantee that future infestations will not occur. If there is concern about termite activity within walls, the wood must be exposed in order to be properly inspected.
Notes are important because they help set clear expectations. They ensure customers understand that termite inspections have inherent limitations and that not all areas or conditions can be evaluated without invasive methods.
 Erasable Pens
I started using erasable pens when the second pest control company I worked for supplied them. They’re the perfect writing instrument for a termite inspector. You need to use a pen because that’s the only way your graph will stay legible after it’s scanned and emailed to the people who write the official termite reports. And when you’re out in the field, mistakes are easy to make. Too many of those in permanent ink and you’re balling up your paper and starting all over again.
Erasable pens solve that problem. They produce nice, dark lines, and if you bump your elbow on someone’s gate while making a notation—no problem. A few back-and-forths with the rubber tip and it’s good as new.
There’s nothing quite like a brand-new erasable pen. The ink comes out extra black and your graph looks like a work of art. But they cost more and they don’t last as long. That’s why most pest control companies won’t supply them.
 Inaccessible Areas
The primary reason fumigation is the California Structural Pest Control Board’s top recommendation is that much of a home’s framing is inaccessible. However, it’s not just walls that block access—many other factors can make a thorough inspection and treatment difficult or even impossible.
- Storage in garages and attics can obstruct key areas.
- Vegetation around the home may block the foundation and eaves.
- Sheds and outdoor storage placed against the home can limit inspection.
- Patio covers can make second-story eaves unreachable.
- Homes built on hills or with third stories may have eaves that are completely inaccessible.
- Slab foundations prevent inspection of the home’s plumbing.
- Ductwork in crawlspaces can block access to certain areas.
- Rooflines meeting rafters create tight, hard-to-reach spots where an inspector may only be able to shine a flashlight.
- Chimney framing may show signs of infestation, but treating it is often impossible.
- Attic insulation covers roughly 50% of rafters, while blown-in insulation hides even more.
- Wood flooring is concealed under furniture and carpets.
- Some homes have no exposed wood at all, with stucco-covered eaves and no attic access.
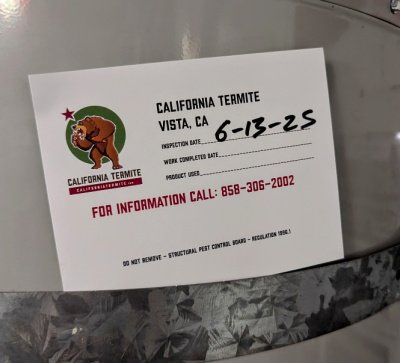 Termite Inspection Tags
Whenever a termite inspection is performed, a tag should be left behind—typically in the garage, attic, or crawlspace. This tag includes the termite company’s name, phone number, and the date of inspection. If the homeowner moved forward with the recommended treatment, the tag should also note the date the work was completed and list the chemicals used.
These tags are valuable to inspectors. They help determine whether a property has been inspected previously, which company did the work, and—most importantly—what products were applied. For example, if a tag indicates that a borate treatment was done recently and the attic was found to be clear of termites, reapplying borates may be unnecessary. A properly applied borate treatment can remain effective for many years, even indefinitely.
You’ll also notice a sentence on the tag: “Do not remove – Structural Pest Control Board – Regulation 1996.1.” While it carries regulatory weight, it’s not unlike the warning tag on a mattress—it’s more about compliance than consequence.
 Fumigation Tags
Fumigation completion tags are usually stapled in the attic entrance or in the garage. These tags are white with red lettering and provide key details: the date of fumigation, the type of fumigant used, the fumigation company that performed the work, and the termite control company that ordered it.
These tags are important because, unfortunately, not all termite companies return after fumigation to clean up or mask old termite evidence. For example, if an inspector finds termite droppings in an attic that was fumigated within the last two or three years, those droppings are likely old and inactive. In cases like this, the fumigation tag helps provide context.
After two years, that tag may be the only remaining proof of fumigation. The State of California only retains fumigation records for two years, and termite companies are only required to keep their records for three.
 Chimney Tubes
Ask any seasoned termite inspector which part of an attic they check first—if one exists—and they’ll likely say the framing around a chimney tube. Experience shows that nine out of ten chimney tubes have drywood termite activity, some of which is inaccessible for treatment. While an inspector’s goal is often to find an alternative to fumigation, an active infestation around a chimney tube presents a challenge. If visible termite droppings aren’t masked and appear to be coming from inaccessible wood members, fumigation is the only viable solution.
The framing around a chimney tube is particularly vulnerable to drywood termites for several reasons. The wood is typically unpainted, providing an easy entry point. Additionally, the heat from the chimney creates temperature fluctuations that can lead to condensation. While drywood termites don’t require much moisture, they thrive in wood that isn’t completely dry. The slight condensation produced when a fire burns can create just enough moisture for a colony to establish and persist.
 Cricket Droppings
Cricket droppings are a litmus test for both the experience and honesty of a termite inspector. They often appear in concentrated piles, sharing the same size and consistency as termite droppings. However, unlike termite droppings, cricket droppings are black and can sometimes be found in areas with no nearby wood.
Drywood termite droppings, on the other hand, are made of wood, which means they take on the natural color of wood. Since wood is only black if it has been painted, and termites eat from the inside out—avoiding paint—their droppings will never be black.
Let’s be honest—termite inspectors get excited when they find a pile of termite droppings. But cricket droppings? They’re fool’s gold—completely worthless in the context of termites and termite treatments. Unfortunately, some inspectors won’t let a small detail like color get in the way of making a sale. And in all the termite training I’ve attended, cricket droppings have never even been mentioned.
If a termite inspector points to black droppings as evidence of an infestation requiring treatment, they’re either inexperienced or dishonest—either way, probably not someone you want to trust with your home.
 Knee Pads
The only safe place to apply your weight in an attic is on a rafter—anywhere else, and you might find your foot poking through the ceiling into the room below. As an inspector, you’re lucky if you can stand up at all in an attic; most require crawling. And while Douglas fir is classified as a softwood, it certainly doesn’t feel soft on your knees.
This is why, if you’re having your home inspected for termites, you’ll likely see the inspector strapping on a pair of knee pads before entering the attic. In fact, if it were my home and an inspector didn’t wear knee pads, I’d question whether they completed a thorough inspection.
 Foundations
There are several types of slab foundations, but only one that termite inspectors need to specifically identify—the post-tension slab. This type can be very dangerous to treat for subterranean termites. Post-tension slabs are reinforced with steel cables (tendons) that are stretched tight using a hydraulic jack. If one of these tendons were accidentally severed during treatment, it could cause serious injury or structural damage.
Aside from post-tension slabs, inspectors typically encounter two main foundation types: raised and slab. Raised foundations require inspectors to suit up and crawl under the home, but the benefit is that subterranean termite activity is much easier to find.
Slab foundations, on the other hand, are simpler to inspect from the outside but much harder to evaluate for hidden termite activity. Unless mud tubes are visible along the foundation or a wall is opened during a remodel, infestations can go undetected. For this reason, some termite companies recommend subterranean termite treatments based on conducive conditions—things like excess moisture or faulty grade—even when no active termites are visible.
 Roofs
Roofs
Every termite report includes a disclaimer like this: “The exterior surface of the roof was not inspected.” That’s because there’s no way to assess a roof’s exterior without removing its overlay. Even roofers can’t determine the extent of rotted sheathing until they remove the top layers.
The underside of the roof sheathing can be inspected if it’s accessible from the attic. However, spot treatments in this area can be tricky since the wood is thin—drill too deep, and you’ll create a hole in the roof.
Roofing material also plays a role in termite treatment, particularly fumigation. Composition shingles and flat roofs pose no issues, but steel roofs can be problematic if they are installed on purlins instead of roof sheathing. Tile roofs, however, are the biggest concern.
Fumigators need to walk on the roof to install the tent, and fragile roofing materials increase the risk of damage. For cement and standard clay tile roofs, fumigators typically offer tile insurance, covering the cost of replacing any cracked tiles. Without insurance, the homeowner is responsible. However, most fumigators won’t insure double-stacked clay tile roofs. If you have one, it’s best to wait until you’re ready to replace your roof before scheduling a fumigation.
